Design Agentforce Interfaces Using Custom Lightning Types

August 27, 2025
2985 Views
Design Agentforce Interfaces Using Custom Lightning Types
Summarize this blog post with:

Salesforce is continuously evolving to help businesses deliver tailored and intuitive user experiences. One of the latest advancements in this space is Custom Lightning Types, which let you design flexible input and output interfaces for Agentforce agent actions inside Lightning Experience.

Whether you’re building complex workflows or just want to go beyond the default UI, Custom Lightning Types give you full control over how data is structured, validated, and displayed.

A custom Lightning type can replace the default UI only for agent actions that use Apex classes as input or output. Integrate custom Lightning types into custom agent actions to override the default UI for both input and output in Agentforce Employee Agent within Lightning Experience.
What Are Lightning Types?

Lightning Types are JSON-based definitions that control how Salesforce structures and validates data in Agentforce actions.

  • Standard Lightning Types: Out-of-the-box types such as text, multilineText, boolean, date, integer, and url. They include built-in editors and renderers that automatically generate UI components like text fields or date pickers.
  • Custom Lightning Types: Your own definitions, built when standard options don’t meet your needs. They let you override the default UI and introduce custom behaviors, perfect for complex data handling.

View Lightning Types in Your Org

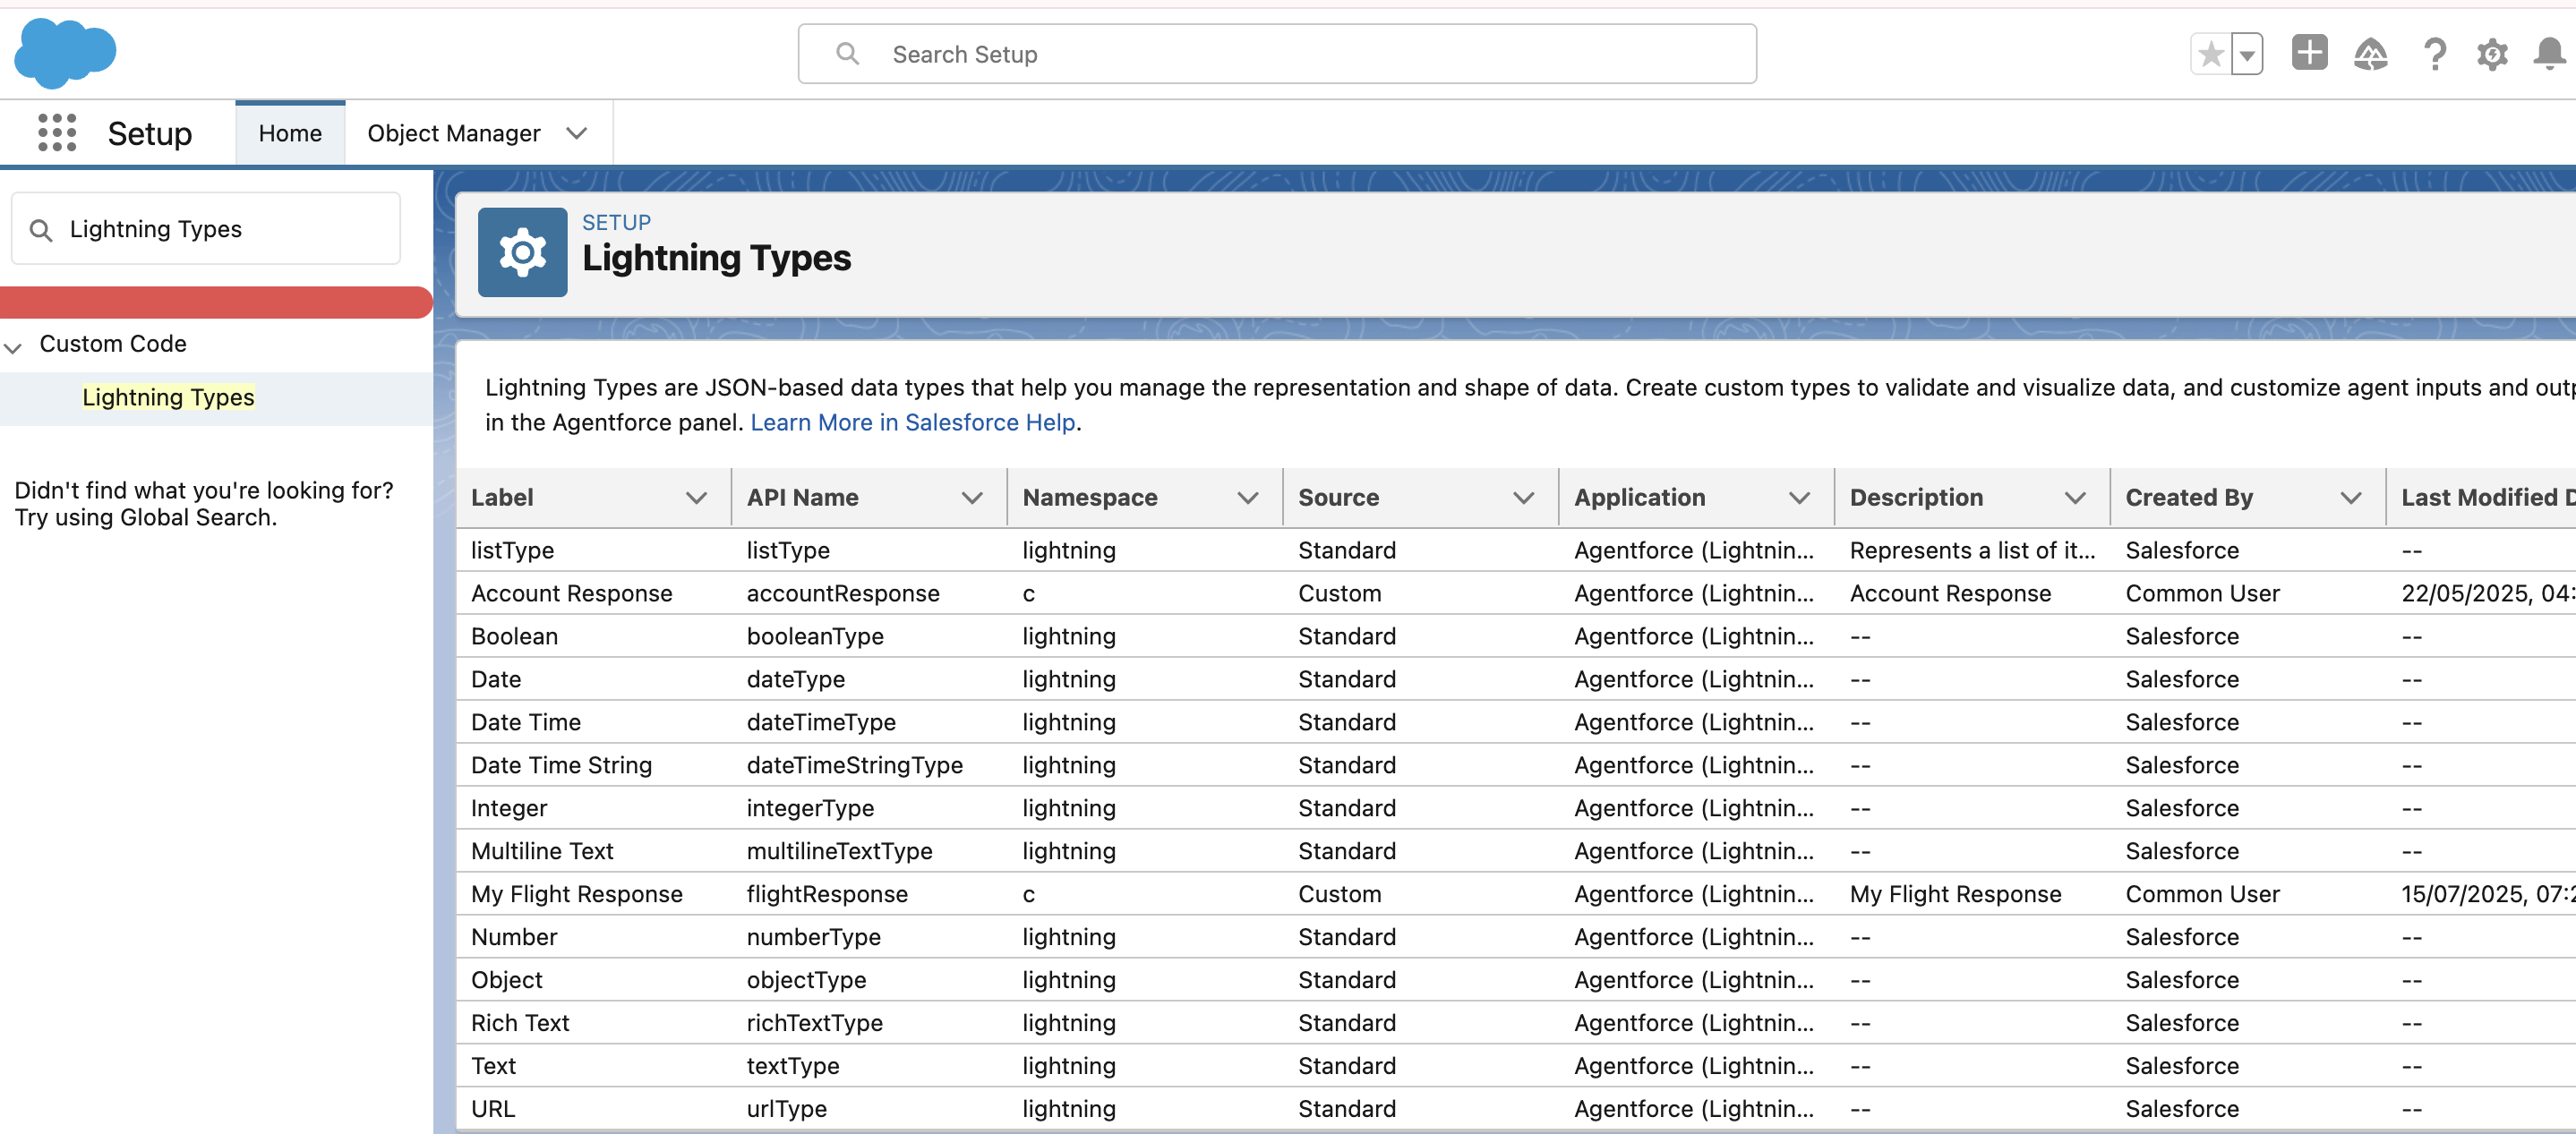
To see both custom and standard Lightning types in your org, go to Setup, enter Lightning Types in the Quick Find box, and select Lightning Types.

Lightning Types in Your Org

Core Building Blocks

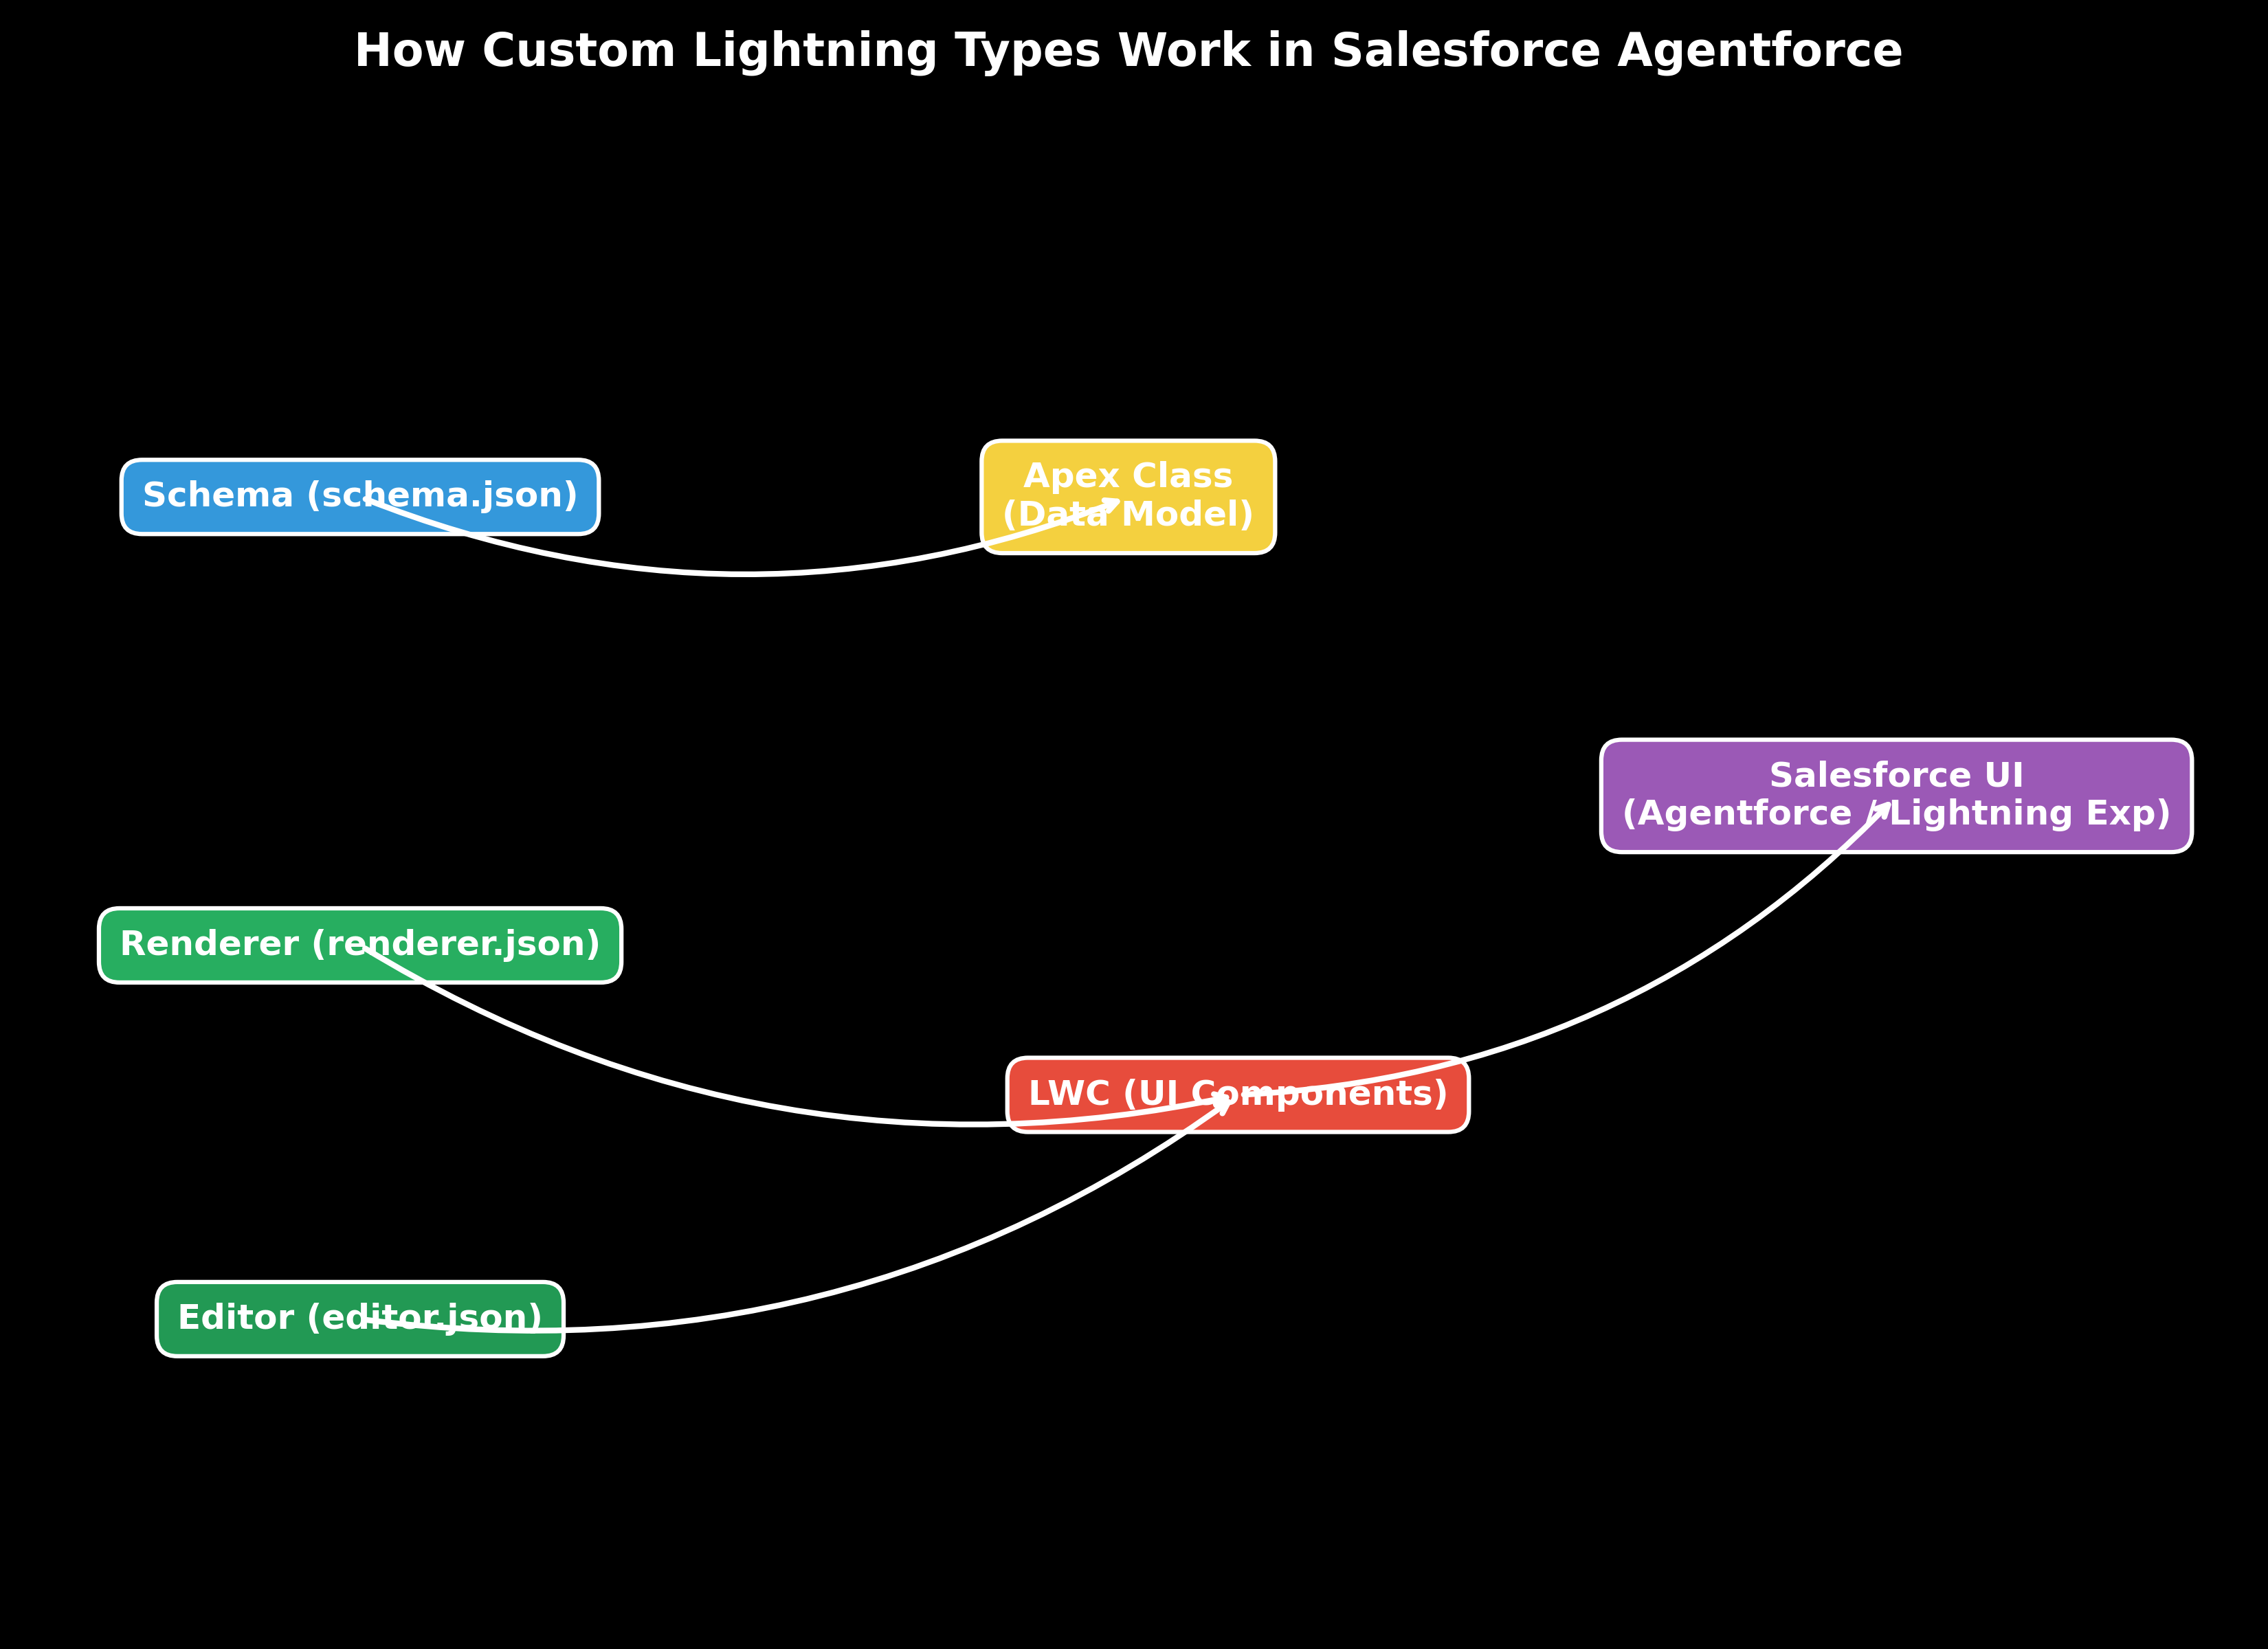
When working with Custom Lightning Types in Salesforce, especially within Agentforce, three key components come into play: Schema, Renderer, and Editor. These elements together control how your data is structured, displayed, and managed by users, giving developers the flexibility to build tailored experiences in Lightning.

  1. Schema (schema.json)

    At the foundation is the Schema file, which acts as the blueprint for your custom Lightning Type. It defines the data structure, sets validation rules, and ensures consistency. Built using the JSON Schema specification, it lets you define field types, required attributes, formats, and constraints such as maximum lengths.

    What ties it all together is the lightning:type keyword, which links the schema to an Apex class. That class becomes the data model powering your custom Lightning Type.

  2. Editor (editor.json)

    Just as the renderer customizes output, the Editor file customizes input. Also optional, it connects to an LWC that gives users a tailored interface for entering or modifying data. Instead of relying on generic form fields, you can design a smooth, guided experience that matches the context of your application.

    This makes working with data more intuitive and aligned with specific business needs.

    Also Read

    Don’t forget to checkout: Salesforce Winter ’26 Release: Debug Panel Updates in Flow.

  3. Renderer (renderer.json)

    The Renderer file is optional but powerful. It determines how your data will appear to users. By mapping to a Lightning Web Component (LWC), the renderer overrides Salesforce’s default UI and allows you to design a more engaging and user-friendly way to present information.

    Whether you need a sleek visualization or a custom layout, the renderer ensures your data isn’t just stored ,it’s communicated clearly in the Agentforce or Lightning Experience UI.

Renderer

Why Use Custom Lightning Types?

Standard Lightning types are great for covering the basics, but real business scenarios often call for more flexibility. That’s where custom Lightning types come in.

They allow you to push past the limits of out-of-the-box options and create experiences that feel truly aligned with your brand and processes.

  1. Enhanced UI Customization

    Every company has its own identity and workflows. With custom types, you can shape the look and feel of your components so they match your brand guidelines and deliver the exact user experience you want.

  2. Complex Data Handling

    Business data is rarely simple. Custom types make it easier to work with nested objects, dynamic arrays, or specialized formats that don’t fit neatly into standard fields. This means your solution can handle more real-world scenarios without awkward workarounds.

  3. Seamless Workflows

    Custom types make workflows smoother and more reliable. Even complex, dynamic processes run effortlessly in Lightning Experience, giving users a clear and efficient path from start to finish.

Example Use Case

Employee Directory by Department
  • Standard Lightning Types: Just a basic list of employee names and emails.
  • Custom Lightning Types:
    • Schema.json captures fields like Name, Title, Department, Location.
    • Editor.json allows dropdown to pick a Department and keyword search.
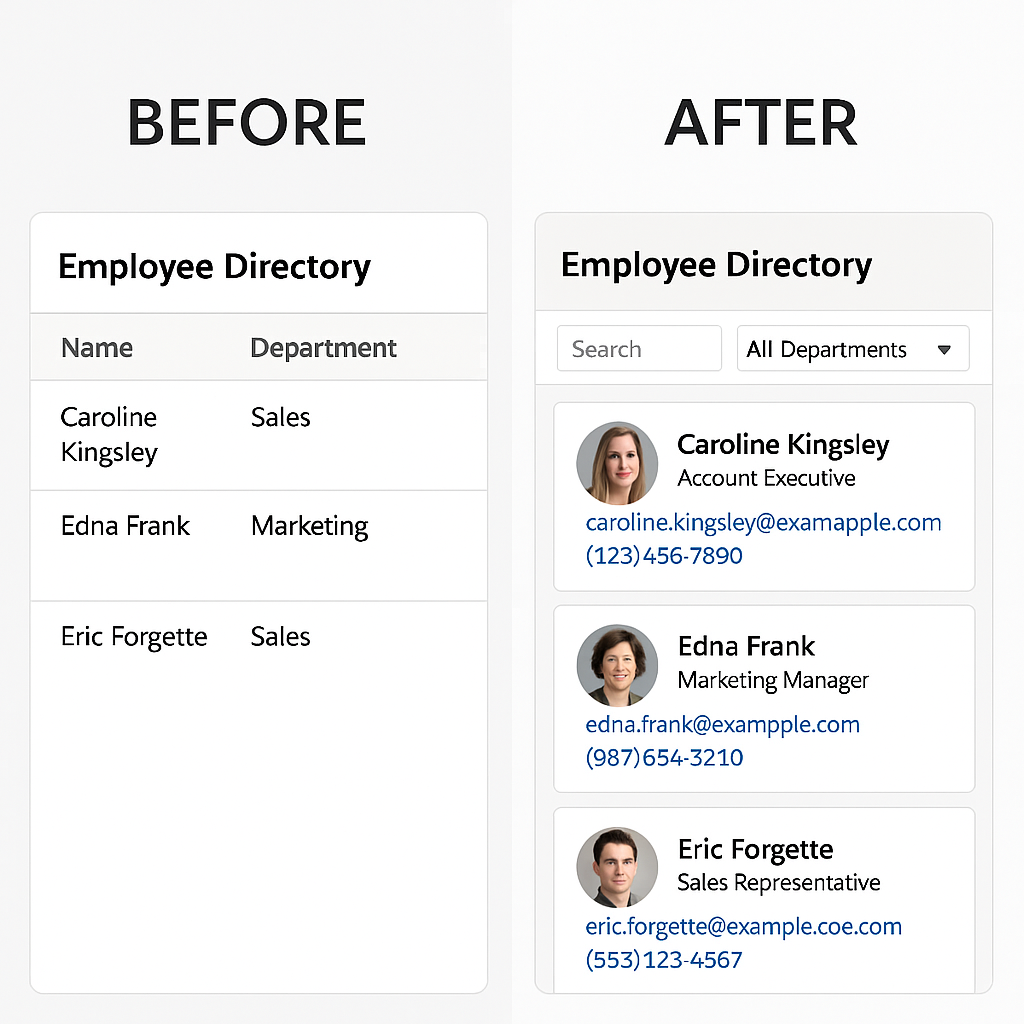
    • Renderer.json outputs profile cards with photos, contact info, and role badges.

This example shows how to build an Employee Directory search for Agentforce using Custom Lightning Types. It defines a filter input type and a directory response type, then overrides the editor and renderer with LWCs.

Folder Structure
+--lightningTypes
			+--employeeDirectoryFilter
				+--schema.json
				+--lightningDesktopGenAi
					+--editor.json
			+--employeeDirectoryResponse
				+--schema.json
				+--lightningDesktopGenAi
					+--renderer.json
		

1) employeeDirectoryFilter/schema.json

{
		  "title": "Employee Directory Filter",
		  "description": "Filter by department and keyword",
		  "lightning:type": "@apexClassType/c__EmployeeDirectoryFilter"
		}

2) employeeDirectoryFilter/lightningDesktopGenAi/editor.json

{
		  "editor": {
			"componentOverrides": {
			  "$": {
				"definition": "c/employeeFilterEditor",
				"attributes": {
				  "dept": "{!$attrs.department}",
				  "q": "{!$attrs.keyword}"
				}
			  }
			}
		  }
		}

3) employeeDirectoryResponse/schema.json

{
		  "title": "Employee Directory Response",
		  "description": "List of employees matching the filter",
		  "lightning:type": "@apexClassType/c__EmployeeDirectoryResponse"
		}

4) employeeDirectoryResponse/lightningDesktopGenAi/ renderer.json

{
		  "renderer": {
			"componentOverrides": {
			  "$": {
				"definition": "c/employeeDirectoryRenderer"
			  }
			}
		  }
		}

5) employeeDirectoryResponse/lightningDesktopGenAi/ renderer.json

{
		  "collection": {
			"renderer": {
			  "componentOverrides": {
				"$": {
				  "definition": "c/employeeCardList"
				}
			  }
			}
		  }
		}

Apex Class


			public with sharing class EmployeeDirectoryService {
				
				/**
				 * Input filter for searching employees.
				 */
				public class EmployeeDirectoryFilter {
					@AuraEnabled public String department;
					@AuraEnabled public String keyword;
				}

				/**
				 * Response wrapper for returning employees.
				 */
				public class EmployeeDirectoryResponse {
					@AuraEnabled public List<EmployeeRow> employees;
					@AuraEnabled public Integer count;

					public class EmployeeRow {
						@AuraEnabled public String name;
						@AuraEnabled public String title;
						@AuraEnabled public String department;
						@AuraEnabled public String email;
						@AuraEnabled public String phone;
						@AuraEnabled public String photoUrl;
					}
				}

				/**
				 * Main method exposed to Agentforce as an action.
				 * Accepts filter input and returns employee list.
				 */
				@AuraEnabled
				public static EmployeeDirectoryResponse getEmployees(EmployeeDirectoryFilter filter) {
					EmployeeDirectoryResponse response = new EmployeeDirectoryResponse();
					response.employees = new List<EmployeeDirectoryResponse.EmployeeRow>();

					String deptFilter = String.isNotBlank(filter.department) ? filter.department : null;
					String keyword = String.isNotBlank(filter.keyword) ? '%' + filter.keyword + '%' : null;

					List<User> users = [
						SELECT Id, Name, Title, Department, Email, Phone, SmallPhotoUrl
						FROM User
						WHERE IsActive = true
						AND ( :deptFilter = null OR Department = :deptFilter )
						AND ( :keyword = null OR Name LIKE :keyword OR Title LIKE :keyword )
						ORDER BY Name
						LIMIT 50
					];

					for (User u : users) {
						EmployeeDirectoryResponse.EmployeeRow row = new EmployeeDirectoryResponse.EmployeeRow();
						row.name = u.Name;
						row.title = u.Title;
						row.department = u.Department;
						row.email = u.Email;
						row.phone = u.Phone;
						row.photoUrl = u.SmallPhotoUrl;
						response.employees.add(row);
					}

					response.count = response.employees.size();
					return response;
				}
			}
			

LWC Targets

  • Editor LWC (input): add target `lightning__AgentforceInput`.
  • Renderer LWC (output): add target `lightning__AgentforceOutput`.
  • For attribute mapping, declare public `@api` properties that match the keys you set in editor.json

Before and After : UI

Before and After UI

The LightningTypeBundle

Custom types are packaged and deployed using the LightningTypeBundle, which includes:
  • schema.json – Defines the data structure.
  • editor.json – (Optional) Overrides the default input interface.
  • renderer.json – (Optional) Overrides how the data is displayed.
Deploying Your Bundle
Once your LightningTypeBundle is ready, deployment is straightforward. You can:
  • Use the Salesforce Metadata API
  • Run Salesforce CLI commands

These bundles also work in both first-generation and second-generation managed packages, making them flexible for different packaging strategies.

Final Thoughts

Custom Lightning Types make Salesforce more flexible and engaging. Standard types work fine for simple inputs and outputs, but they quickly reach their limits when business processes need more control. By creating your own schemas and combining them with custom editors and renderers, you decide exactly how data should be captured and displayed.

This becomes especially powerful in scenarios with complex data, dynamic workflows, or unique branding needs. From turning a basic employee list into a searchable profile gallery, to improving product catalogs, or building interactive dashboards.

References

How useful was this post?

Click on a star to rate it!

Average rating 4.8 / 5. Vote count: 4

No votes so far! Be the first to rate this post.

Written by

Raja Patnaik

With over a decade of experience in Salesforce, I specialize in crafting smart solutions for industries like real estate, healthcare, banking, and payments. As director of Technology Architecture at RafterOne, I help businesses grow and streamline operations by building powerful B2B Commerce solutions on Salesforce. I’m passionate about turning ideas into reality—from gathering business needs to designing, developing, and launching solutions that create real value. I’ve had the opportunity to lead projects integrating tax, shipping, and payment systems into e-commerce platforms, improving workflows and customer experiences. A highlight of my work has been automating CPQ and billing processes using the Lightning B2B Store. I'm also honored to serve on the Salesforce B2B Commerce Partner Advisory Board, contributing to the evolution of future products. I love learning and staying ahead of the curve, focusing on solving complex problems and driving meaningful results for businesses.

Get the latest tips, news, updates, advice, inspiration, and more….

Contributor of the month
contributor
Antonina Kharchenko

Technical Writer, Salesforce Admin at SFApps.info

...
Categories
...
Boost Your Brand's Visibility

Want to promote your products/services in front of more customers?

...

Leave a Reply

Your email address will not be published. Required fields are marked *